Showing posts with label DIY. Show all posts

Sunday, November 6, 2011

Fresh Take on Edible Centerpieces.

The thing I love the most about wedding planning is the endless amount of creativity that exists, so when I get to work with couples who challenge me with an idea that gets me to put my thinking cap on, I couldn't be happier.

This weekend, I met up with good friends of ours who are getting married next summer. The bride is just about the coolest nutritionist on the planet, so her desire to have edible centerpieces didn't really surprise me, but did get me thinking, "How on earth could we possibly make these cool?". Most research presents tacky hollowed out large fruits or vegetables stuffed with more fruit and veggies, which is such a literal take on the idea. Outside of these tacky traditional takes on edible wedding centerpieces, mini cakes, cupcakes and candy jars are the second most commonly used foods, but we want these ones to be truly unique, so I've had to think a little outside the box.
Sourced from Rachael Ray.
Food is probably one of the best ways to bring people together and every bride wants her wedding to be memorable, so having an edible wedding centerpiece doubling as an appetizer or dessert is a surefire way to make your wedding a night people will remember.

Depending on the vendor or the types of products used, these types of centerpieces can be just as expensive as floral ones, so be sure to do your research on what products might fit with your budget, or how much work can be expected if you are putting them together yourself.
Sourced from Martha Stewart.

For this wedding, I'm hoping to do two or three variations:
  • The first being, a combination of leafy greens, whole artichokes which have a very floral shape to them, bunches of grapes and whole limes.
  • The second incorporating skewers of meats styled to resemble flowers, cheese, crackers and pate, possibly offset by more leafy greens on silver platters.
  • The last, a wooden box, similar to the following, packed tightly with a selection of beautiful fresh veggies, accompanied by various complimentary dips.
So much to think about, and I'm sure it will all evolve with input from the bride and groom, but I'm incredibly confident that we will end up with a gorgeous result!
Sourced form Nancy Conner Design.
Lastly, a few more suggestions on how to incorporate food into your centerpieces:
  • Skewers of bocconcini cheese, cherry tomatoes and basil leaves standing upright in a jar.
  • Deli meats woven back and forth or twisted around skewers, resembling flowers.
  • Use a tiered cake or dessert stand to present a variety of sweets on each tier.
  • Bunches of asparagus, tied with a ribbon, accented by white pillar candles.
  • Mix whole grapefruits, apples, lemons, etc. with brightly colours flowers.

Monday, June 20, 2011

Spreading the Love: The Invitations.

If you've been following, you probably read in my last post about the sneak peak for the invites which captured our experience letter pressing our invitations. It's been just over a month and we now have them complete!

When I started the whole wedding planning process, I knew I wanted to hand make my invites because I was probably the only person who was going to be able to give myself what I wanted but also needed time to waiver before deciding on the final product. There have been many tears shed over these invites, but I wouldn't have done it any differently. 


For the concept of the invites, I knew they had to set the tone for the wedding. I know some people thing it's silly but it was a must have in terms of design. I wanted them to be glamorous with a mixture of elements and that was one thing I never did waiver from through it all. I wanted feathers, crystal and pearls integrated in some way and was able to use leftovers from the boutonnieres to complete the look. For the paper, I wanted a thicker more rough card stock balanced against a smooth, translucent vellum. As for the typeface, doing both printed and handwritten copy gave them a more vintage and personalized touch which was really important to me. I wanted people to really feel as though they were getting more of a handcrafted letter than simply an invite that was pressed 100 times and looked exactly like the last.

The Invitation Run Down.
If you've ever tried to learn about letterpress, you probably know it's one of those things that not many people know anything about and those who know a little something don't want to offer much advice because really, anything can happen and they'd hate to be the one. It's important to choose the right weight to your paper, something I knew, but still didn't know exactly how the weight of the paper I chose would work out. Knowing what I know now, I would definitely have picked a much heaver paper. For the actual letterpressed invite, I found an inspiring border on the web, but couldn't find anything like it on the stock photography sites so I made a similar version using Adobe Illustrator. I then ordered the letterpress plate through Boxcar Press - who were incredibly helpful in making sure they got everything they needed to actually create the perfect plate.

After that, it was on to the map. To do this, I basically took a screenshot of Google Maps and outlined it in AI again. I then purchased an art deco looking building icon as a place marker and added the street names. The most important part I found when making the map, was to leave only major roads and intersections that are vital to finding the location. Getting too detailed can actually be detrimental to your design. 

Next, I had to come up with something  keep the invite and map connected so that when they were taken out of the envelope, nothing was missed. Scouring the internet, I found a number of things that could be used (jumbo bobby pins, flat bookmarks, etc.) but the most economical product were jumbo paperclips that had a circular glue pad at the one end. I assembled feathers, pearl boutonniere sprays and ribbon to create a glamorous clip that also doubled as a gift for our guests. To add the handwritten element, I hand wrote small tags to attach to the feather clip that reiterated the RSVP directions and signed off with 'Love Laura and Byron'.

For the envelope, I couldn't get my self away from wanting to line them and I found an awesome gold damask Indian paper from Curry's Art Supply that was incredibly durable and didn't rip easily. Wanting to carry through the handwritten element again, I part stamped, part handwrote our address and names on the back invite flap.


The Suite.
Our guests are replying via our wedding website so no reply cards were needed, which greatly cut down on both supplies and postage along with being environmentally conscious. That said, though, we did need to create about 20 invitations to our civil ceremony so I decided to hand write these invites as a more personalized measure. The envelopes were still lined with the same damask paper and included a smaller, similar version of the feather clips.

Last but not least, are our thank you cards. I'm a huge believer that thank you cards must be hand written, but I also wanted to tie them in with the invitations. Luckily, the fact that the letterpress on our invites wasn't a huge impression, we could simply stamp them to get a similar look. So I bought a Martha Stewart stamp kit from Michael's with my trusty 40% off coupon, and off we went! We stamped and  hand wrote the envelope flaps with our names and addresses again to finish it all off!

So, many hours of work plus blood sweat and tears, but it was all so worth it to get the perfect invites!

Tuesday, May 3, 2011

Sneak Peak: Invitations!

Well, hello again world! I honestly don't know where the time has gone, but I have been on a serious neglecting my precious little Tweetcheeks! This year has gone past in a whirlwind so far and I decided I had to force myself to sit down and reflect on what I've accomplished in the last two months!

Looking back, I have tackled a ridiculous amount of projects both wedding and non-wedding related, but probably the most exciting one has been our invitations. With a little less than a month to go before it's time to head to the post office, I have had my game face on.

At the beginning of April, Byron and I visited with Jes, the gal who ultimately got me hooked on letterpress and we began the daunting task of letterpressing our invites, which I never thought woud happen. Probably the most stressful part was getting the plate made and being sure everything was just perfect, but the kind folks at Boxcar Press were great about calling to explain any issues with the files and what they would ideally like to work with. Next thing I knew, I had the plate in two weeks! As a first time letterpress-er I was surprised at exactly how thin the plate was and actually had moments of wondering whether or not I'd even ordered the right thing - it was so thin and flimsy - but of course, after it's attached to the plate base, it makes so much more sense!

Definitely a close second as the most nerve-racking part was the actual printing itself. It took two hours to be sure the plate was properly leveled, ink loaded and had just the right amount of padding behind the paper, but when we got it, it was such a sweet feeling! Unfortunately we had to print single invitations due to some issues with a missing bases, and the actual level indentation could have been greater, but when you're only printing 100 and you have a great team, it's nice to spend the time doing something productive!

Since then, I've been working on finishing the venue map and printing on velum, tearing my hair out trying to make a decision over which paper to use for the envelope liner (I found one!), updating our wedding website to accordingly and finally lining and addressing the envelopes themselves.

So I am now on the final steps of finishing the clips to hold the map and invite together, but another 30 to go and I'm DONE! It's been such a great experience, although there's been much frustration, but I am so incredibly happy with how they've turned out and I would do it all over again. I'll post final pics once they get mailed out!

Friday, January 14, 2011

Wedding Planning To-Do List.

An organized bride is a happy bride!

New year means getting inspired to get stuff done and I think this is especially so with wedding planning. With wedding shows popping up everywhere in the spring, I figured it was a good time to share my Ultimate Wedding Planning To Do List once again. Being a project manager for a living, I'm all about lists to keep things organized. I wanted to transfer my obsession with to-do lists over to wedding planning which is why I created this ultimate list.
Image sourced from Laura Jane Photography
It can be overwhelming upon first look, but that's just because I've included everything you could imagine so you don't get that sense of being overwhelmed later on! 

Hope some of you find it useful! I'd love your feedback if you see something that is missing. This list does get updated from time to time, so keep checking back.

For the Ultimate Wedding Planning To-Do List, click here

For more wedding planning resources, click here


Monday, January 3, 2011

Wedding Vendor Contact List.


Short and sweet today! We are officially nine months away from our big day and next up on my ultimate wedding planning to-do list is the wedding vendor contact list. 

While a small detail, this wedding vendor contact list is vital in keeping both yourself and others organized during the planning leading up to the wedding and also on the wedding day itself.

Keeping a full list of your hired vendors and all of their contact details will keep this information at your fingertips. Be sure to pass this information off to key people on your wedding day - your maid of honour, parents, best man, etc. 

For the full Wedding Vendor Contact List, just click here.

Sunday, October 3, 2010

DIY Bouquet with a High-End Look

There's something so incredibly beautiful about a tight grouping of a single type of flower. This weekend I got inspired to try to make a diy bouquet using faux flowers that would give a high-end fresh flower bouquet a run for its money. While I'm not completely convinced that faux flowers are the best idea for a daytime wedding, I do think that it is incredibly difficult to tell the difference in more intimate lighting without physically touching the flower.

I started my trip at the dollar store where they had these fabulous creamy full bloom roses that were better than those I could find at Michael's and for a  fraction of the price. A few of them came with rosebuds which I initially didn't think would be useful for this particular bouquet, but the variety in blooms actually worked quite nicely. The addition of lace, guinea feathers, a glass brooch and ribbon really finish this diy bouquet off and give it that high-end look we're all after for such a great price.

STEP 1. Trim the stem of excess leaves and twigs and group all stems of roses together to create a nice round shape. You may need to bend some of the stems to get this perfectly round shape. Wrap the stems in wire in a couple of places to keep it al together.


STEP 2. Cut 6 - 8 pieces of lace drapery trim. Bunch each piece together so that you have a ruffled look. Position them evenly around the stem of the bouquet, as close to the bottom of the flowers as possible. Secure with wire.


STEP 3. Wrap the stem in ribbon and sew a brooch to to the ribbon handle. Sew 10 guinea feathers around the base of the bouquet.


SUMMARY OF COSTS
Flowers - $9
Drapery Lace - $1.67/m
Antique Brooch - $5
Ribbon $2

Total Spent CAD17.67

Whoever thinks that a high-end look can't be achieved with a low-end budget is sorely mistaken! I'm so pleased with how this diy bouquet turned out!

Monday, September 20, 2010

lovebirds: Matt and Malinda

Here we have it - tweetcheeks' first pair of lovebirds!  

This past July a good, good childhood friend of mine wed the love of her life. If I thought she was incredible before, I am now thinking she is super woman. Malinda is probably the most motivated, all around talented, genuine and by far the busiest person I know. She claims she's a procrastinator, but she's really so on top of absolutely everything. She and her fiance Matt purchased a condo just months before their wedding and still managed to make their first home their own amidst the craziness of wedding planning. Just two days after their wedding she left for Venezuela to compete in the Pan American Indoor Field Hockey Championships and just another two days after her return she amazed me further with the finest detailed email with so many valuable tips for DIY weddings. She's such a great example of how a bride really can have her dream wedding even on a limited budget with 200 guests!

Oh! And did I mention she made her wedding cake the night before the wedding?! Talk about a real diy bride!

*for a more detailed look, at the story board, click here.

Both the ceremony and reception were held at The Marriott Ottawa, and guests were invited into a space filled with a gorgeous mixture of decorations inspired by the blend of the two families. For cocktail hour, guests headed upstairs to the mezzanine while the room was transformed for the evening reception. Once back downstairs, guests were greeted by another beautiful, intimate setting for the remainder of the reception including dinner and dancing.  

Tuesday, August 17, 2010

Fabulous Poms

I just stumbled upon this precious gem and fell in love immediately! Poms are so big right now, but it is hard to justify making them out of paper when they look so gorgeous outdoors and there is always a risk of rain. I've been trying to come up a more durable way to making these poms, but those incredibly fantastically crafty folks over at OnceWed beat me to it! While I try not to recycle other people's imagination as much as possible, in hopes that I can offer new and unique suggestions, these were too fabulous not to share. They would be so great lining the aisles and hanging from trees and make an lasting impression while costing pennies to make! Check them out here.


tip! For an even more durable and cheaper option, try swapping the lanterns out for styrofoam balls.

Monday, August 16, 2010

Wedding Day Survival Kit

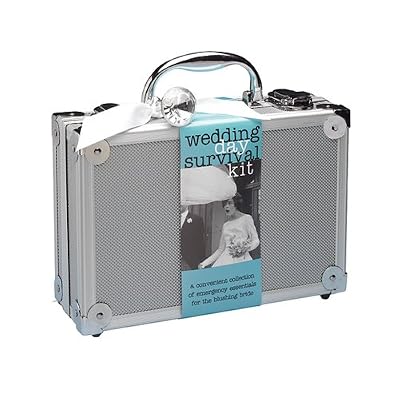
Next in the very long line of important to-do lists to share is the 'Wedding Day Survival Kit'. Containing all of the items to bring with you on your wedding day, this little list will help you be sure you have all the items available to tackle (and avoid!) many issues. 
Of course there are some obvious items, like the dress, suit and rings, but you would be surprised how many times these are left behind! Set aside a suitcase to take all of these items with you and begin adding to it over time so you're not panicking to prepare at the end. Hopefully none of the emergency items will be needed, but you can never be too prepared!

I have separated them by guys and gals and then into further categories, but feel free to add as many other things you need!

The image on the right is from Target, retailing for $50 (USD) and is a great starter kit, but you'll definitely need to add on.

To download the list, click here

To view other helpful forms for diy wedding planning, click here.

Sunday, August 8, 2010

Wedding Venue Checklist

If you had been following the debacle we had with selecting a venue, you will appreciate the brand new checklist I have made on what to ask when interviewing a potential venue. It might sound a bit odd, but I decided to refer to it as 'interviewing' because when looking for a venue you are really trying to figure out if they are a the best candidate to take on the responsibility of hosting your ceremony and/or reception. When you are spending thousands (and in some cases tens of thousands) of dollars on your wedding, you only want the best, most capable people working for you.

I have covered everything from the accessibility to payment plans and hope the list comes in handy for those who need it! As usual, feedback is always appreciated if you see things that should be added or improved upon!

Download a copy of this list, or scroll to view more below.

To view other helpful forms and lists for diy wedding planning, click here.

WEDDING VENUE CHECKLIST.

Accessibility.
  • Is the venue easy to find? Is it easily accessible by transit and major routes?
  • How easy is the commute between the wedding ceremony and the reception and how long is the drive?
  • Is there ample parking for all attending?
    tip! It is usually safe to assume that parking is not included in your cost, especially in the downtown area. Do not assume that parking is included in your cost. Most venues charge a fee for their valet service as well as their parking garages. Alternatively, if they don’t own any parking space, city lots may be available for rent or parking vouchers available for purchase.
  • Are there any events (i.e. festivals, parades, sporting events) that will make parking difficult?
  • Are there provisions for elderly or physically challenged guests e.g. restrooms? Are there elevators to assist those who cannot climb stairs?
  • Are there suggested hotels in the area for overnight accommodations for your out of town guests?
  • Where will you take photographs? Can the coordinators at the venue recommended spots on the grounds or nearby parks?
  • If having your ceremony and reception at a venue that is quite large (ie. resort) will a shuttle to and from the ceremony and reception be required? Making transportation a no-brainer for your guests will ensure that things run on time and help them to know they are taken care of.
Facilities.
  • Is your venue available on the required date and are any other events or weddings booked for that day? If so, are they separated enough so as not to feel crowded?
    tip! If the venue does have space for more than one event, they often are unable to guarantee that you will be the only event there that night. However, if there is another event going on, it is important to know how that will affect your guests. For example, will your guests have their own restrooms or will they be shared with the guests attending the other event?
  • Can you have your ceremony in the venue and how and where will it be?
  • Does the venue suit your theme? Does it fit with your style and wedding colours?
tip! A great venue requires very little décor and will speak for itself with a wow factor. Sometimes investing in a slightly pricier venue can actually work in favour of your budget. A cheaper venue might not require spending a lot of money on flowers and decorations to make it beautiful or fit in with your theme.
  • How long does it typically take for the staff to change over the room? 
  • How many people can the venue accommodate?
  • Will it comfortably accommodate the maximum number of guests you are expecting?
    tip! It is important to remember that the number of tables you will require can impact how much additional space remains for a dance floor, photo booth, lounge area, dj, band, cake table, gift table, etc.
  • If you haven’t seen it already, ask to see pictures of the venue as it would be set up for a wedding or to return on a date when a wedding it being set up. Are there different set up types?
  • If there are certain decorations that you see now and like, will still be available on your wedding day? Are they an additional cost to incorporate?
tip! On the other side, some venues will not remove anything from their space for your event, so although the beer sign on the wall sets the mood for their everyday atmosphere, if you do not want it there the night of your celebration, you should ask if it can be removed.
  • Does the venue have limitations on decorations that can be used? 
  • Is any remodeling or redecorating planned between now and your wedding day?
  •  Is the venue child friendly (ie. highchairs, space for diaper change)?
  • Are the restrooms in good condition and stocked with essentials?
  • What time will the venue open for outside vendors to come in for prep or drop off?
  • What time can guests start coming in?
  • What time must the party end? Does the venue allow enough time for your party to be set up/disassembled?
    tip! It is important to ask how long you have the venue. Most venues charge an overtime fee for extra hours past the required exit time which can start at 500 dollars.
  • Does it have air conditioning?
  • Is there a room available for the bride to use before and after the ceremony and during the reception to change clothes or freshen up?
  • Are there any restrictions in regards to using the facility {ie. smoking, candles, alcohol, confetti, etc.}?
  • Does the venue have preferred vendors? Is there a landmark fee to opt out and use your own?
    tip! Some venues require you to use their preferred vendors because they have strict contracts with them. The vendors often include cake, floral, entertainment, and photographer & videographer companies and opting out will often incur hefty costs in addition to paying your own vendor (sometimes as much as 15% of your total bill with the new vendor).
  • How will the staff be dressed and how many will be required?
  • Can you meet the manager beforehand to go over details?
  • Is there a coat check or safe place for guests to store their coats and personal belongings?
  • Is there a safe place for gifts?
  • If it is an outdoor location, do they have any backup plans for rain or other inclement weather?
  • Visit your venue at the time of day your wedding will take place. Is the lighting suitable?
  • Does the wedding venue offer enough assistance to during the wedding planning process and are they easily available to meet or to discuss issues and concerns with you?
    tip! Many facilities will have a Wedding Day Coordinator on staff and at no extra charge. Check to see if the same person be available on your wedding day and if you can you meet them now. This is an important relationship to build and you must be able to find a good connection with this person since they will be a key partner in planning your wedding. Make sure it’s the right fit!
 

    Wednesday, August 4, 2010

    A Sneak Peek!

    A little while ago I reviewed different types of wedding websites that are available either for free or paid. I really weighed all of the options of each of the offered sites, but never did really like the templates for any of them so I decided to go with making my own from scratch using a free website builder. I've finally gotten our wedding website nearly complete and wanted to share a preview!

    I used wix.com, and found a basic template which I began playing with and modifying to suit my preferences. It was a tad difficult to work with and I did have to walk away a few times and come back later, but now that it's almost finished, I can say it was well worth it! Of course, not all of the final information is available and I need to purchase a quality background image, but I'm certainly glad the major part is over!

    While it still shows the wix.com advertising on the site, it is subtle and the whole thing was free. You can opt to purchase a monthly plan that allows you to remove the ads and get our own domain name, but I decided the ads didn't really bother me and that I could purchase a domain name and have it mask the redirect to the site for a total of $25 as opposed to $14/month.

    I'll wrap it up just before the invites go out and post the final URL for you to see! For now, here's a sneak peek!

    Saturday, July 31, 2010

    How To Trim Your Budget

    For me, being a DIY bride isn't just about cutting costs; it's about the journey of getting to the big day. I would hate to look back on all of this one day and not have special memories about all aspects of the event! I've put together a list of how to trim your budget, all of which I have used myself, with exception of the dress. Hope it's helpful!

    If you are not settled on an exact date and time of year, ask if your venue has an off season. These off seasons tend to have much cheaper rates both for you and for your guests.

    Many venues discount their Friday nights. We booked in for the Friday of a long weekend so we could really make the best of the rest of the weekend off. Around here, with gorgeous weather being so short, it's very popular to take the Friday off on a Monday long weekend anyways!

    Make your own bouquet, centre pieces, boutonnieres and corsages out of silk, paper or fabric flowers, feathers, etc. By cutting this out of your budget, you can probably even be able to afford a wedding planner for a 30-day countdown for less than the total fresh flower budget.

    Ask for discounts. Don't be shy! Vendors do have inflated prices as soon as a wedding is mentioned,  but they want your business. Once you receive a quote, provide them your maximum amount you are willing to spend, and they'll often work with you to give you something fabulous. You're spending a lot of money and even a savings of $100 can go a long way! We were really lucky and our venue even waived the entire venue rental fee for us (a savings of $3500!), which made it possible for us to get our favourite venue. 

    Pool your resources. We all have connections in some way to incredible resources who can help at discounted prices, for trade of services or even for free.

    To avoid the costs of a full dinner, hold your ceremony later in the evening and do a cocktail reception with hors d'oeuvres and open bar. Alternatively, hold a posh early afternoon ceremony with an afternoon reception of tea and desserts.

    Look for locations that allow you to bring your own alcohol. They'll usually supply the juices, pop, limes, straws, napkins, etc. for a minimal fee, but you get to avoid the incredibly inflated prices of using their alcohol. Another plus is that you can really tailor your bar to your guests. But be careful and always ask your venue if there is a corkage fee.

    Purchase a bridesmaid dress instead of an actual wedding gown. There are so many gorgeous bridesmaid dresses out there that are a fraction of the cost of a bridal gown and they normally come in ivory.

    Shop around, buy used items and look for coupons. Sites like retailmenot, redflagdeals and many others are such great resources with coupons for stores like Michael's, VistaPrint, and even hotel chains, make up stores, salons. Even purchasing items on sale can be cheaper than renting and you can re-sell them to make some (or more!) of your money back! Look for classifieds like projectwedding to find used items.

    Etsy has so many great vendors charging far less than a bridal boutique.  Everything from hair accessories, veils, jewellery, clutches, invitations and garters are available. The possibilities are endless for a DIY bride with Etsy or for a bride who doesn't want to do any of it but likes the idea of something handmade and supporting a growing business.


    Making your own invites can cut costs by 50% or more depending on the complexity of the design and the number of invites you need to make. A couple of nights with good friends and some great wine and you'll have a completely unique design and lasting memory for years to come.

    Most importantly, stick to your budget and give yourself time to work out all the kinks. I've been sticking to a rule that by the time the next 'to-do' time rolls around on my list, that I already have it completed - stay one step ahead.

    To view other helpful forms for diy wedding planning, click here

    Saturday, July 17, 2010

    It's Official!

    We're getting married! The Capitol Theatre up at Yonge and Eglinton has officially been booked for Friday, September 2nd, 2011!! We decided to do the long weekend because we not only want to have the entire weekend for celebrating but because it is also the 2 year anniversary to our engagement. Of course, the fact that a Friday night is cheaper than a Saturday certainly doesn't hurt either.

    So now we get to the really daunting part - the To-Do list. I've been scouring the web for thorough instructions, but I always feel that so much is missing. I think a lot of the people putting these lists together are so familiar with wedding planning that they leave so much off - mainly the little details - which means diy brides are left floundering at the end. As a  diybride who has absolutely no experience with planning a wedding, I decided I could put together a more thorough list. I started with my own list of things that seemed obvious to me and then began adding items I found on other lists. I will continue to add to my ever growing list (it's already at 7 pages!)  in hopes that I can cover as much as possible. I haven't seen anything as nearly as complete yet, so I hope it's a helpful resource to those  diy brides who stumble upon it. Any feedback is appreciated!

    Feel free to download the wedding to do list by clicking here.

    To view other helpful forms for diy wedding planning, click here

    Saturday, July 3, 2010

    Oh Summer Days

    Nothing makes a summer afternoon even more relaxing than a great cocktail. This afternoon Byron and I went to the beach to relax with some magazines, sunscreen (and the ever present tanning oil for Byron!) and good music. We hung out for a couple of hours, played a round of croquet and soaked up some sun. 

    When we got home, we made some dinner, mixed some deeee-licious cocktails about talked about what we'd like to do for our rehearsal dinner. We decided it would most suit us to do an all out BBQ where we can all relax and enjoy ourselves. And what else would be better than having fun custom cocktails? We came away with two fantastic summer cocktail recipes and of course, our all-time fave, but any of them would work well with different fruits, citruses and garnishes:
    • Strawberry Gin Cocktail
    • Raspberry Mojito
    • Classic Gin and Tonic
    Of course these would also work well for the brides and grooms who are supplying their own alcohol and hiring their own bartenders. Imagine a gorgeous country-chic wedding with spiked punch bowls or hand crafted deliciousness? Mmm....I think I'll go keep experimenting. Besides, it's Saturday night!

    Click here to download the recipes! 


    Top: Strawberry Gin Cocktail 
    Bottom: Raspberry Mojito

    Thursday, July 1, 2010

    The Prettiest Bouquet

    So I found the most gorgeous bouquet to be in inspired by and boy, is it unique. Made out of paper, this gorgeous little gem I found at Project Wedding is right up my DIY ally. As much as I love fresh flowers, I really want to do things differently but still keep everything classic. The colours and mixtures of textures  are a perfect combination to make something really beautiful. I know it's going to take a lot of work to do my bouquet, and possibly smaller versions of for the bridesmaids, but I think they'll really be an attention grabber. One key element I'll be trying to add are bleached peacock feathers.

    *image sourced from projectwedding.com
    Not only is finding an economical way (with a little bit of hard work) to get an expensive look for less a huge passion of mine, but I have always loved the look of fascination on people's faces when they do the second look and realize that something is handmade. It's one of the reasons I went to school for what I did. I love working with my hands to make stunning things. I'll share how they turn out and whether or not I survived making all of those little flowers...just like the invites, I think a bottle of wine (or 3 or 4 in this case!) and some crafty friends will keep me sane throughout this process.

    Tuesday, June 29, 2010

    Invitation Inspiration

    I have wavered a bit about exactly how I wanted to do our invites. Originally I posted this gorgeous, classic mustard yellow invite suite, which I was convinced I would want to do in letterpress, but after doing more research about the design (if I didn't feel like undertaking this task myself) including professional printing costs, I decided my money could be far better spent. 

    Of course, "better spent" means hand making our invites, but also something incredibly sweet and unique to satisfy my creative side. Some people have asked why I would want to invest so much of my personal time to design and construct these when I could just buy something and they'll likely quickly end up in the garbage. My answer is always the same: I get so much satisfaction out of doing crafts like this and really,  spending a few Friday nights with a good friend and a bottle of wine is a memory I will really cherish.

    While I still have elements from the original mustard yellow ones I found, I wanted to be sure to include all of my things to make something handmade using lace, feathers, monograms, wax seals, pearls and mixes of scripts and more boxed fonts. Below are two handmade invites I've come across so far from which I am taking my inspiration.


    Even if I'm not successful for our final invites, it will have been a fantastic activity to post about. I'll share them once I'm finished!

    *images sourced from stylemepretty.com

    Friday, May 21, 2010

    Leave Them Breathless

    This week I got inspired to make a bouquet and centre piece for the budget conscious bride. I tried to think about the most cost effective items that were still beautiful.

    I don't think people give Baby's Breath very much credit as most people consider it to be somewhat of a weed that's added to floral arrangements as a filler. The interesting thing is that it really is quite beautiful on its own and can fit into so many themes depending on how it's used.

    Used in a bouquet it has a very country chic look about it.


    THE BOUQUET HOW-TO

    Materials.
    - Five bunches of baby's breath $15.00, local florist
    - Ribbon $0.99 cents per metre {with lots left over!}
    - Boutonniere Pins 5.99 for 100 at Michael's
    Total cost: $21.98

    Steps.
    1. Bunch approximately 5 bunches of Baby's Breath together so the centre top is a bight taller than the sides, giving it a nice round shape. {If you find you've got long and short pieces combined on one stem, snip the stems to separate the bunches so you have more smaller pieces to work with}. Leave the ends long. You can snip them to the right length later right before you add the ribbon.
    2. Secure the stems with floral wire. Be sure to get as close to the base of the flowers as possible, for a nice clean look.
    3. Cut a piece of card so it can wrap around the stem once. Secure with tape. This helps to smooth out the bumps in the stem so when your ribbon is wrapped, it's got a more polished look.
    5. Cut all the ends at once for a nice clean base.
    6.Begin wrapping your ribbon around the stem from top to bottom and secure with your boutonniere pins.
    7. High five your neighbour for your job well done!

    Used in a centre piece, it's got the most beautiful city posh look.


    THE CENTRE PIECE HOW-TO

    Material.
    Glass Candlestick - $8.00, Winners Clearance
    Florist's foam / Oasis - $2.99, Michael's
    8 bunches of Baby's Breath, $18.00, local Florist
    Total cost: $28.99

    Steps.
    1. Soak your Oasis/ Florist's foam as directed on the package.
    2. Secure it to the top of your candlestick with crazy clue, tape, or whatever method works for you.
    3. Snip the pieces of your Baby's Breath so they have about a 4-inch stem.
    4. Begin sporadically placing the Baby's Breath into the foam. As you go, be sure to fill consistently so that there aren't and bald spots. Step back every now and then with a fresh set of eyes.
    5. One satisfied you can no longer see the green oasis, place your hands on either side of the arrangement and ever so gently push the sides in and up to maximize its fullness.
    6. Give yourself a pat on the back!

    There are so many other things that I can imagine making. What about aisle decorations? Grab a round foam oasis and fill completely with flowers. Attach a ribbon from the top and hang from the side of the chair or pew.

    Hope you are inspired to make your own!

    Thursday, March 25, 2010

    New Daily Essentials!

    I have been a devoted MAC girl since high school, but have recently made a very unexpected move after trying the Bare Minerals products. I was introduced to it last summer when visiting my best friend, Kate. After a trip to the gym, I realized that I didn't have any makeup with me, so I borrowed some from her. I must admit that I was very doubtful that this solely powder based product would be nearly as good as my favourite MAC Studio Tech foundation and pressed powder, but  I was pleasantly surprised and later on found myself constantly thinking about how fresh and good I felt that day.

    When I recently ran out of foundation, powder and bronzer, I decided to take a peek at the Bare Essentials product at Sephora. Turns out they have a starter kit that comes with oodles of stuff for only $70. Definitely worth the try!

    While I didn't use the instructional DVD that came with the package, the book was helpful and the application is incredibly easy to master.

    Thursday, February 18, 2010

    Things I've Learned So Far...

    Hi Lovelies! Since I'm doing so much of the wedding necessities myself, I've been compiling a list of things I am discovering as I go and thought I'd share my first few lessons with you :).

    Listen to your gut and stick to your guns. You'll constantly have people telling you what you should do. Remember: It's YOUR day and it's all about you. You’ll get the feedback from both people who have and haven’t been married. Those married will give you what they wish they had done, and those not yet married will give you what they would want to do. Listen to what they have to say (some will be valuable resources and ideas), but stick to your guns and do what feels right to you.

    Read lots of blogs. There are so many good ideas out there to modify to your own needs. These have been so valuable to me. See the blogs I follow regularly on the right hand side of this page.

    Save a lot of pictures (and clearly label where you found them).  I like pictures from the web better than what's in magazines because:
    a) these magazines cost a fortune and  there are so many amazing ideas on blogs that are clearly sorted by category, and;
    b) you can make fantastic inspiration boards [see next point] out of them. Pictures are so important because they are direct reflections of what has inspired you. 
    Save anything you like the idea of and save them in folders labelled by category (ie. Dress, Flowers, Cakes) etc. This way you can always go back later and easily weed out what you don't like a second or third time round.
      
    Make Inspiration Boards. These are very important when it comes to helping you 'listen to your gut and stick to your guns’. If you don't have access to an inspiration board application via the web, you can make some awesome ones if you're crafty in Word/Pages.

    Be creative. Think outside of the box for ways to use your artsy skills do things yourself. Where ever you can cut costs you can either splurge on your must-haves or even save yourself a few dollars in the end!

    Use your neighbour's husband's sister's best friend.
     Now's the time to be resourceful and keep your ear to the ground.  You really never know who might come out of the woodwork with advice or great deals!

    Keep it Classic. Who wants to look back on their wedding day pictures and think ‘What was I thinking?’ When I look back on my parents and grandparents weddings, they were so classically beautiful. No ridiculously trendy colours or fashions, just simple and elegant and so incredibly gorgeous.

    Monday, February 8, 2010

    Chocolate Caramel Candy Apples

    I had never been a real fan of candy apples until I visited this little cafe called Golden Mint Coffee and Tea at Yonge and College here in Toronto and had the most fantastic chocolate caramel treat! Sweet Granny Smith apple covered in a layer caramel, then dipped in chocolate and wrapped with chocolate shavings, nuts, gummy bears or sprinkles!

    How adorable would these be as guest treats or takeaways? Or even seating cards with labels attached to the stick? Sadly, I haven't been given the Golden Mint recipe...but I did find a fantastic substitution on the Style Me Pretty site that was provided by Jess Country Flowers.  What a great way to say thank you to your guests for coming for the evening!

    Check out the SMP recipe below or take a look at a Martha Stewart recipe for mini candy apples, too! Great for a cocktail reception like mine ;).

    Ingredients
    2 cups packed brown sugar
    1 cup light corn syrup
    1/2 cup butter (1 stick)
    1 can sweet condensed milk
    1 teaspoon vanilla

    24 granny smith apples (bought from Costco wholesale $7 dozen)
    3 lbs. butter at Costco $7
    pointed wooden round sticks at local craft store or candy making supply company online
    ribbon from Costco ($8 for 50 yard roll at Costco)

    Instructions

    Melt the butter in a sauce pan, add the brown sugar and corn syrup. Stir constantly with a wooden spoon over medium heat. Add the sweet condensed milk, continuing to stir. Bring the mixture to 245 degrees F. Once off the stove, add the vanilla and stir. Cool down to about 210 degrees and dip your apples or pears.

    Twist off the stems on your apples and put in the wooden sticks.

    Place your dipped fruit on a sheet pan which is lined with parchment paper. Let dry and then dip in melted chocolate. While the chocolate is still wet, dip in toasted coconut, chopped nuts or add pieces of candy. Place back on the parchment paper to thoroughly dry. Melt some white chocolate and place into a zip lock bag, cut the very corner off and drizzle over the apples for detailing.

    Package up in clear cellophane and tie up with a pretty ribbon. These make for incredible gifts from the heart. Store in a cool place or refrigerate. To enjoy, let them sit in room temperature for 1/2 hour. Place on a cutting board and slice.

    Bon appetit!
    Related Posts with Thumbnails